(K)CSSのみで吹き出し付きの対談式Q&Aページを作成
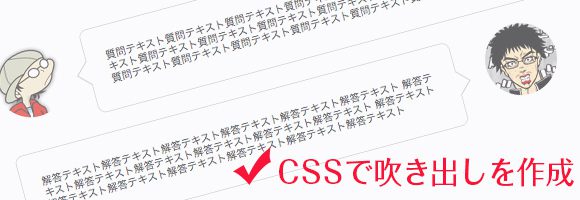
CSSで吹き出しをつくるっていうのは、少し前に流行りましたね。昔からよく使っていたんですが、今回アイコン画像と吹き出しを組み合わせた対談形式のページを作成したので、備忘録としてまとめておきます。
まずは、吹き出しの作成
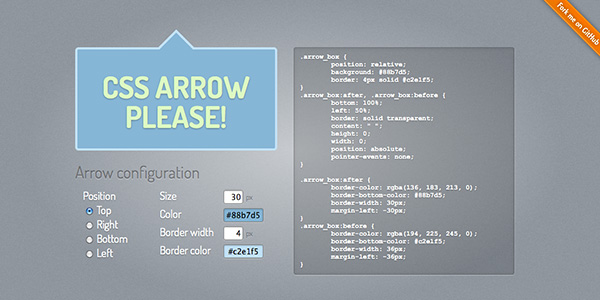 吹き出しの作成は一から作成するよりジェネレーターに任せるのが楽チンです。今回使用したジェネレーターは「cssarrowplease」です。お手軽に作成できるので重宝してます。
今回は質問用と解答用の吹き出しを作成するので「Right」と「Left」の2種類の吹き出しを作ってもらいました。
※抽出したCSSは改行なし状態なので「CSS Beautify」で整えます。
※class名は自分のお好みで書きかえます。今回は2種類の吹き出しなんでクラス名は2つ作成してます。
かぶってるプロパティ値を整える
今回は2種類ですが違う所は、吹き出し部分の位置のみなので色指定などのかぶってる部分を調整します。
【CSS】
.arrow_answer,
.arrow_question {
    position: relative;
    background: #fff;
    border: 1px solid #c8c8c8;
    padding:30px 25px;
    border-radius: 10px;
    width:510px;
    font-size: 13px;
}


.arrow_question {
    float: right;
    margin-right:30px;
}

.arrow_answer:after,
.arrow_answer:before,
.arrow_question:after,
.arrow_question:before {
    top: 50%;
    border: solid transparent;
    content: " ";
    height: 0;
    width: 0;
    position: absolute;
    pointer-events: none;
}


.arrow_question:after,
.arrow_question:before {
    right: 100%;
}

.arrow_answer:after,
.arrow_answer:before{
     left: 100%;
}

.arrow_answer:after,
.arrow_question:after {
    border-color: rgba(255, 255, 255, 0);
    border-width: 15px;
    margin-top: -15px;
}

.arrow_answer:after{
    border-left-color: #fff;
}

.arrow_question:after{
    border-right-color: #fff;

}

.arrow_answer:before,
.arrow_question:before {
    border-color: rgba(200, 200, 200, 0);
    border-width: 16px;
    margin-top: -16px;
}

.arrow_answer:before{
    border-left-color: #c8c8c8;
}

.arrow_question:before {
    border-right-color: #c8c8c8;
}
※「.arrow_question」につけてる「float:right;」は、アイコン画像が左に来るためにつけてます
アイコン画像が横に来るように配置
吹き出しがあるなら、喋る人の画像があるべきなので、アイコンを横に置いて話してるようにレイアウトします。
※関係無いですけど、アイコン画像の一つは「ジョジョ顔メーカー」です。
【HTML】
<div class="question_Box">
<div class="question_image"><img src="img/question_image01.jpg" alt="質問者の写真" width="90" height="90"/></div>
<div class="arrow_question">
     質問テキスト質問テキスト質問テキスト質問テキスト質問テキスト質問テキスト
</div><!-- /.arrow_question -->
</div><!-- /.question_Box -->


<div class="question_Box">
<div class="answer_image"><img src="img/question_image02.jpg" alt="解答者の写真" width="90" height="90" /></div>
<div class="arrow_answer">
     解答テキスト解答テキスト解答テキスト解答テキスト解答テキスト解答テキスト
</div><!-- /.arrow_answer -->
</div><!-- /.question_Box -->
【アイコン画像用に追加したCSS】
.question_image{
     float: left;
}

.answer_image{
     float: right;
     margin-right:20px;
}

.answer_image img,
.question_image img{
     border-radius: 50px;
}

.question_Box{
     margin-bottom: 25px;
     overflow: hidden;
}
これで、対談形式用のデザインが出来上がりました(・∀・)
まとめ
吹き出しの三角の長さの微調整や、<div>で括りすぎのような・・・もっと、いいマークアップはないかなとか・・・思う所はありますが、短い文章のトーク形式なら、こういうのがわかりやすいかなと思います。
あんまりトークが長すぎると、しつこい感じもしますが、そこはページのテイストに合わせて作成するって事で。今回は以上ですm(_ _)m
改良版をアップしてます
スマホに対応させたバージョンとLINEのトーク風にレイアウトを組み直した記事を書いたので、よければ合わせてご覧ください
(K)CSSで作った対談(会話)式吹き出しをLINE風にしてスマホにも対応させる
- <Prev (K)jQueryのslideToggleを使ってスマホに最適なアコーディオンメニューを作成
- Next> (K)WP Social Bookmarking Lightを特定のページのみに表示させる(WP覚え書き)